10 Must Know Git Commands That Almost Nobody Knows
October 11, 2021
Learning Git is not easy. There are tons of confusing commands and for most people it is their first experience with the command line. Because of this most people only learn the absolute basics of Git such as adding and committing files. This is only a small portion of what you can do with Git, though, and in this article I will be breaking down 10 advanced Git commands that everyone should know.
If you are unfamiliar with the basics of Git (adding, committing, branching, etc.) watch this full Git tutorial first.
If you prefer to learn visually, check out the video version of this article.
1. Add/Commit All
One of the most common things you will do when working with Git is adding and committing a bunch of files at once. The standard way to do this is usually running an add command followed by a commit.
git add .
git commit -m "Message"
This works fine, but you can actually combine this into one command.
git commit -a -m "Message"By using the -a flag when committing you are telling Git to add all files that have been modified and then commit them. This runs into issues with new files, though. Since the -a flag only adds modified files it will not add new files or deleted files. Unfortunately, you cannot use commit to add these types of files, but you can use the -A flag with add to add them all.
git add -A
git commit -m "Message"
By using this command you can now add all files even if they are new or deleted. You will also notice this command is very similar to the first git add . command. The only difference is that using -A will add all files within the repository while using the . will only add all files in the current folder your terminal is open to. This is why I always recommend using -A if you want to add all files in the repository.
2. Aliases
In the previous section we talked about how you can add and commit all files, but it requires two commands and is bulky to write out especially considering it is something you will be doing all the time. That is where Git aliases come in. With aliases you can write your own Git commands that do anything you want. Let’s take a look at how you would write an alias for the above add/commit command.
git config --global alias.ac '!git add -A && git commit -m'With this simple line we are modifying our global Git config and adding an alias called ac which will run the command git add -A && git commit -m. The code looks a bit confusing, but the result is that I can now run git ac "Message" and it will do the full add and commit for me.
Now lets breakdown how this works. The first part of the command is git config --global. This just says we are modifying our global Git config since we want this alias to be available in any Git repository.
The next part is alias.ac. This says we want to create an alias called ac.
Finally, the last part is the full command !git add - A && git commit -m. This is just our normal Git command, but we have prefixed the command with an exclamation point. The reason for this is that a Git alias by default assumes that you will be calling one single git command, but we want to run a command that is more complex than a single Git command. By prefixing our command with an exclamation point Git will not assume we are running one simple command. To explain this further here is an example of creating an alias for git commit -a -m "Message"
git config --global alias.ac "commit -a -m"As you can see we are just calling a single simple Git command so we can leave out the word git and since we have no exclamation point at the start of our command Git will assume that we are trying to call a single Git command and will add the git for us.
3. Revert
The last two commands have been pretty complex so let’s look at a really simple command. The revert command simply allows us to undo any commit on the current branch.
git revert 486bdb2All you need to do is pass the commit you want to revert to the command and it will undo all changes from that commit. One important thing to note, though, is that this only undoes changes from that exact commit. If you do a revert on a commit from a month ago it will not undo all changes made since that commit. It will only undo the changes in that exact commit.
Another important thing to note is that using revert does not actually remove the old commit. Instead it creates a new commit that undoes all the changes from the old commit. This is good since it will preserve the history of your repository.
One common trick is to revert the most recent commit which can be done with the following command
git revert HEAD4. Reflog
Another simple, but useful command is reflog. This command lets you easily see the recent commits, pulls, resets, pushes, etc on your local machine. This is a great way to track down any issues that may have come up to see what you did to cause those issues.
git reflog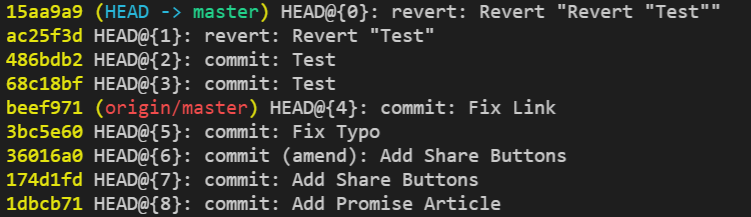
5. Pretty Logs
Another useful logging command in Git is the log command. This command combined with some special flags gives you the ability to print out a pretty log of your commits/branches.
git log --graph --decorate --oneline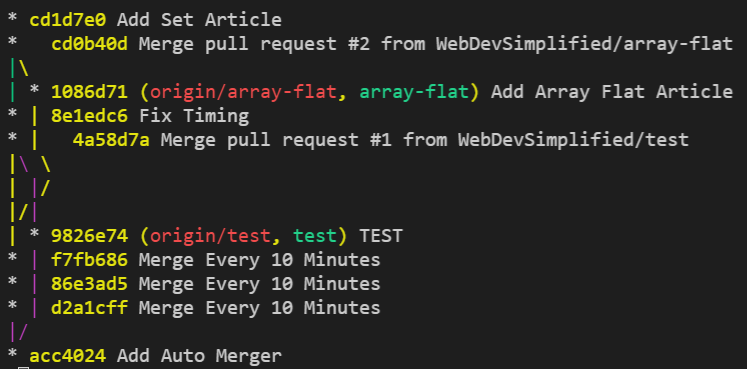
6. Searching Logs
You can also use the log command to search for specific changes in the code. For example you can search for the text A promise in JavaScript is very similar as follows.
git log -S "A promise in JavaScript is very similar"This command returns to me the commit where I added the article on JavaScript promises since that is the commit where I added this text.
7. Stash
How many times have you been working on a feature when an urgent bug report comes in and you have to put all your current code on hold. It is very tempting to do a simple add/commit with a WIP message so you can switch branches to the main branch before fixing the bug, but this clogs up the commit history and is not ideal. Instead, the best thing you can do is use a stash.
git stashThis simple command will stash all your code changes, but does not actually commit them. Instead it stores them locally on your computer inside a stash which can be accessed later. Now you can go about fixing the urgent bug and once you are done with that you can pop your changes from the stash to continue working.
git stash popThis command will take all the changes from the stash and apply them to your current branch and also remove the code from the stash. This is the ideal workflow if you need to quickly stop working on your current code to start working on something more urgent.
8. Remove Dead Branches
If you are working on any decent sized project odds are your repository has tens or hundreds of branches from previous pull requests. Most of these branches have probably been merged already and are deleted from the remote repository, but they are still on your local machine. This can get annoying when you have hundreds of dead branches on your machine which is where this command comes in.
git remote update --pruneThis command will delete all the tracking information for branches that are on your local machine that are not in the remote repository, but it does not delete your local branches. In order to do that you need to run a bit of a tricky command.
git branch -vv | awk "/: gone]/{print $1}" | xargs git branch -dThis command will list out all of your branches and then search for any branches that have the remote tracking set to gone. This gone status is set from the previous command where we removed the tracking information for branches that no longer exist in the remote repository. Then we are grabbing the branch name for the deleted branch with the {print $1} command and passing that to git branch -d which will delete the branch for that name.
This is a pretty complex command which is why I recommend combining the previous two commands into one simple git alias that can do all this for you.
git config --global alias.prune 'git remote update --prune && git branch -vv | awk "/: gone]/{print $1}" | xargs git branch -d'9. Bisect
The bisect command in Git is incredible for finding which commits caused certain bugs. It is very common for a repository to have thousands of commits from hundreds of developers so when a bug report comes in it can be tricky to track down which changes caused this issue. With bisect, though, this problem is trivial. In order to understand why this command is so amazing let’s look at how to use it.
git bisect start
git bisect bad
git bisect good 48c86d6
To start a bisect you need to run three commands. The first command starts the bisect. The second command tells Git which commit is the bad commit with the bug. If you leave this blank, as we have, Git will just use the latest commit. The final command tells Git which commit is known to not have this bug. In our example we know that in commit 48c86d6 there is no bug.
Now after you run these three commands Git will choose the commit in the middle of these two commits and grab all the code from that commit. You can then test to see if the bug is in this commit or not. If the bug is present you just type git bisect bad and it will select the commit that is halfway between this bad commit and the last good commit. If the bug is not present then you can type git bisect good and Git will select the commit that is halfway between this good commit and the last bad commit. You keep repeating this process of typing either good or bad until eventually you are able to narrow it down to the exact commit that caused the bug.
This is amazing at narrowing down your bug search since some bugs can be really hard to track down without knowing what code was changed to cause it.
10. Destroy Local Changes
Sometimes you make changes and realize that you need to scrap everything you have done so far. This usually isn’t a big deal if you haven’t committed yet, but if you have made multiple commits it can be hard to exactly remove all changes. This is where the reset command comes in. By running the below command you can wipe out all changes on your local branch to exactly what is in the remote branch.
git reset --hard origin/mainThe above command says to forcefully delete all local changes on your current branch and replace them with the code from the main branch in the remote. It is important to note that this will remove all local changes you have made so only do this if you really want to delete all the changes you have made and need to start fresh.
Conclusion
There are hundreds of other amazing Git commands I could have covered but these 10 commands are some of my favorites when it comes to really being a power user of Git. Hopefully, at least one of these commands can help you with mastering Git.