How To Structure React Projects From Beginner To Advanced
July 11, 2022
React is incredibly flexible due to the fact that it is entirely unopinionated in how you structure and write your code. This flexibility, though, makes it difficult to structure a React project since there are no standards set by React. In this article I will be covering 3 different folder structures that can be used across various sized projects. Theses structures will go in order from the simplest to the most complex, but don’t just jump to the most advanced/complex structure because depending on your project size a simpler approach may be better.
If you prefer to learn visually, check out the video version of this article.
Preface
Before I jump into the different folder structures I want to mention one thing. All of these folder structures will only be dealing with the files/folders inside the src folder. Outside the src folder your files will be very project dependent so there is no good universal structure to apply since it will depend heavily on your project and the libraries you use.
Simple Folder Structure

When you first run create-react-app there are no folders inside the src folder and for most people the first 2 folders they create are a components and hooks folder. Now this is obviously a really simple folder structure but for smaller projects with less than 10-15 components this is honestly not a bad approach.
hooks
The hooks folder contains every single custom hook in your entire project. This is a useful folder to have in any size project since almost every project will have multiple custom hooks so having a single place to put them all is really useful.
components
The components folder in the simple folder structure is incredibly straightforward since it will contain every single component in your entire application. Now obviously as your project grows beyond 10-15 components this folder can become incredibly unruly to deal with which is why in all other folder structures our components are spread across multiple folders and given more structure. For small projects, though, this added complexity is not needed and a single folder is just fine.
__tests__
The final folder in this structure is for all your test code. Generally on smaller projects like this I find that people tend to store all their tests in one folder (that is if they write any tests at all). Overall, I think this is fine for smaller projects, but again this is something I would change as your project grows in size.
Pros
As mentioned the biggest pro of this folder structure is the pure simplicity of it, but beyond that this structure really isn’t doing much for you.
Cons
You will notice that this folder structure doesn’t say what to do with things like images, utility functions, React contexts, etc. This is because for the most part smaller projects don’t have many of these bonus files so you can get away with just storing all those files in the root of your src folder. Obviously, as your project scales this will become a mess quick which is why any project beyond small projects should be using at least an intermediate folder structure.
Intermediate Folder Structure
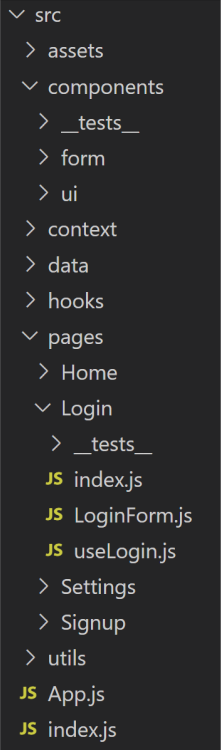
Already from the image above you will notice that this folder structure includes a ton more folders which cover pretty much any file type you can think of in a React project. For the most part with a folder structure like this you should have almost no files in the root of your src folder other than things like your index.js file.
The other big change between this folder structure and the simple folder structure is that we now are breaking our project into pages which encapsulate all the logic for specific pages into one single location. This is really useful on larger projects since now your can find all the information related to your pages in one folder instead of having to search across multiple folders and sift through unrelated files to find what you want.
You will also notice that our tests are now localized to the specific folder/files they are testing. This makes it easier to see which code is tested which in general just makes testing code easier when the tests are located in the same location as the code being tested.
pages
The biggest change to this folder structure is the addition of the pages folder. This folder should contain one folder for each page in your application. Inside of those page specific folders should be a single root file that is your page (generally index.js) alongside all the files that are only applicable to that page. For example in the above image we have a Login page which contains the root file index.js, a component called LoginForm, and a custom hook called useLogin. This component and hook are only ever used in the Login page so they are stored with this page instead of being stored in the global hooks or components folders.
This separation of page specific code from your more general global code is the biggest benefit of this system over the simple folder structure. It is easier to see what your application is doing when all the relevant code is collocated in a single folder.
components
Another big change you will notice with this example is that our components folder is further broken down into subfolders. These subfolders are really useful since they help keep your components organized into different sections instead of just being one massive blob of components. In our example we have a ui folder which contains all our UI components like buttons, modals, cards, etc. We also have a form folder for form specific controls like checkboxes, inputs, date pickers, etc.
You can customize and breakdown this components folder however you see fit based on your project needs, but ideally this folder shouldn’t get too large as many of your more complex components will be stored in the pages folder.
hooks
The final folder that is a repeat from the simple folder structure is the hooks folder. This folder is pretty much identical to the previous hooks folder, but instead of storing every hook in your application it will only store the global hooks that are used across multiple pages. This is because all page specific hooks are stored in the pages folder.
assets
The assets folder contains all images, css files, font files, etc. for your project. Pretty much anything that isn’t code related will be stored in this folder.
context
The context folder stores all your React context files that are used across multiple pages. I find on larger projects you will have multiple context you use across your application and having a single folder to store them is really useful. If you are using a different global data store such as Redux you can replace this folder with a more appropriate set of folders for storing Redux files instead.
data
The data folder is similar to the assets folder, but this is for storing our data assets such as JSON files that contain information used in our code (store items, theme information, etc). This folder can also store a file that contains global constant variables. This is useful when you have lots of constants you use across your application, such as environment variables.
utils
The final new folder is the utils folder. This folder is for storing all utility functions such as formatters. This is a pretty straightforward folder and all the files in this folder should likewise be straightforward. I generally like to only store pure functions in this folder since if a utility function has side effects then it is most likely not just a simple utility function. Obviously there are exceptions to this rule, though. Also, if you are unfamiliar with pure functions check out my complete pure functions guide.
Pros
The biggest benefit to this new system is that all your files have their own folder. The actual root src folder should have almost no files in it.
Another huge benefit is that your files are now collocated based on the page they are used in. This is good since generally as a project grows it is more and more important to have files that are used together stored together since it makes understanding, writing, and reading code easier as it reduces the amount of global code stored in your general components, hooks, etc. folders.
Cons
The biggest con to this system is that as your application grows even larger your pages folder will start to become less and less useful. This is because as your application gets more pages it is more common that a single feature will be used across multiple pages instead of just one. When this happens you need to move the code out of the pages folder and into the other folders in your app which lessens the usefulness of your pages folder and bloats your other folders.
For example, if you have a simple todo list application that stores your todo list on just one page then the pages folder for your todo page can store all the code for your todos. If you then add a second page that lets your group todos under projects you now have two pages that need to show todo information so you can no longer keep these todo files in your pages folder. At a certain size nearly all your code will be shared across multiple pages which is where the advanced folder structure comes in.
Advanced Folder Structure
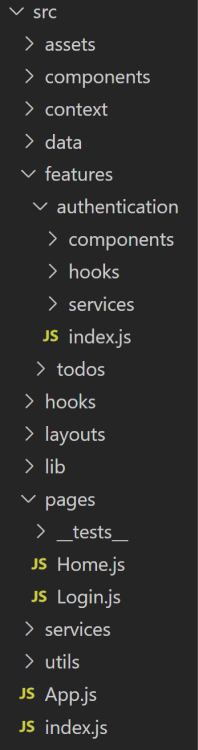
If you just glance of at these two folder structures you may notice a ton of similarities, but there is one major difference which is the features folder. This features folder is a more elegant way of grouping similar code together and best of all it does not suffer from the same problems as the pages folder from the intermediate folder structure since your features will almost never have mass amounts of overlap between them.
Since so many of the folders in this structure are repeats from the intermediate structure, I will only be covering the folders that have changed between these two structures.
features
The massive change between these two structures is the features folder. This folder works very similarly to the pages folder from the intermediate structure, but instead of grouping by page we are instead grouping by feature. Already this is easier to understand as a developer since in 90% of cases when you are going to add new code to a project you are either going to implement a new feature, such as adding user accounts, or you are going to modify an existing feature, such as adding the ability to edit todos. This makes working with the code easier since all the code for each feature is collocated in the same place making it easy to update and add to.
The actual structure of this folder follows the pages structure in that there are individual folders for each feature (authentication, todos, projects, etc.) and inside those folders are all the files for that feature. The biggest difference you will notice between the pages folder and the features folder, though, is that within each feature you have another set of folders. This folder structure for each feature is a complete copy of all the folders inside the src folder (other than the features folder obviously) and an index.js file. This means that within your feature all your code can be organized by type (context, hook, etc.) while still be collocated together.
The index.js file is then used as a way to expose a public API for everything that is usable outside the feature folder for that given feature. It is common that you will want to have a bunch of code that is private to the specific feature you are working on, but with JS if you create an export in a file it can be used in any other file you want. In larger projects this can become a problem if we only want to expose a few components/methods for our feature which is where the index.js file comes in. This file should export only the code you want to be accessible outside the feature and then every time you use code for this feature in your application you should import it from the index.js file. Doing this is really nice since your global code footprint is much smaller this way and using the features becomes easier since you have a limited API to work with. This can even be enforced by an ESLint rule which disallows any import from a feature folder that doesn’t come from index.js.
{
  "rules": {
    "no-restricted-imports": ["error", { "patterns": ["@/features/*/*"] }]
  }
}
Above code from Bullet Proof React.
This import rules utilizes absolute imports (which I recommend using on larger projects). You can set this up by using a .jsconfig or .tsconfig file with the following code.
{
  "compilerOptions": {
    "baseUrl": ".",
    "paths": {
      "@features/*": ["src/features/*"],
    }
  }
}
pages
The other major change with this new structure is the pages folder. This folder now only contains one file per page and the reason for this is that all the logic for the features on the pages are in the features folder. This means that the files in the pages folder are actually quite simple since they just glue together a few feature components and some general components.
layouts
The first new folder is the layouts folder and this one is really simple. This is just a special folder for placing any layout based components. This would be things like a sidebar, navbar, container, etc. If you application only has a handful of layouts then this folder really isn’t needed and you can just place the layout components in the components folder, but if you have multiple different layouts used across your application this is a great place to store them.
lib
The lib folder is another fairly simple folder. This folder contains facades for the various different libraries you use in your project. For example, if you use the axios library then this folder would contain a file for that axios library that creates your own API overtop of the axios API which you then use in your application. This means that instead of importing axios directly in your project you would import the file from this folder associated with axios.
Doing this makes is much easier to update, and replace libraries since all the library specific code is in one place in your application. It also makes it easier to customize third party libraries to your own need. This pattern is called the Facade Pattern which you can learn more about in my Ultimate Facade Pattern Guide.
services
The final new folder is the services folder. This folder contains all your code for interfacing with any external API. Generally, on larger projects you will have many different APIs you need to access and this folder is the place to put the code that interacts with those APIs. Again this helps clean up your code since instead of littering a bunch of API interaction code in your application it is all within this one folder.
Pros
The biggest pro by far of this structure is the ease of adding/updating code. Since the bulk of the code is broken down into different features it is easy to add new features or update existing features. This separation also simplifies the codebase since now files can be considered private which helps with understanding the codebase.
Another benefit is that the code outside the features folder is generally pretty simple to understand since most of the business logic is wrapped up inside the features folder. This again makes understanding and working with the code that much easier.
Cons
The biggest con of this structure is the complexity. If you are working on a larger scale application then this added complexity is no big deal since it ends up reducing the overall complexity of the project, but if you only have a handful of features/pages this system can end up being overkill with many of the folders being completely unused or only containing a few files. Because of this, I only recommend using this folder structure on more advanced larger projects that need the extra separation.
Conclusion
No matter the scale of your project, folder structure is crucial. With these 3 folder structure templates you should be able to take any size project you have and adapt one of these structures to fit your exact needs which will help you to write better and cleaner code.