Finally Master Next.js's Most Complex Feature - Caching
January 8, 2024
Introduction
Next.js is an amazing framework that makes writing complex server rendered React apps much easier, but there is one huge problem. Next.js’s caching mechanism is extremely complicated and can easily lead to bugs in your code that are difficult to debug and fix.
If you don’t understand how Next.js’s caching mechanism works it feels like you are constantly fighting Next.js instead of reaping the amazing benefits of Next.js’s powerful caching. That is why in this article I am going to break down exactly how every part of Next.js’s cache works so you can stop fighting it and finally take advantage of its incredible performance gains.
Before we get started, here is an image of how all the caches in Next.js interact with one another. I know this is overwhelming, but by the end of this article you will understand exactly what each step in this process does and how they all interact.
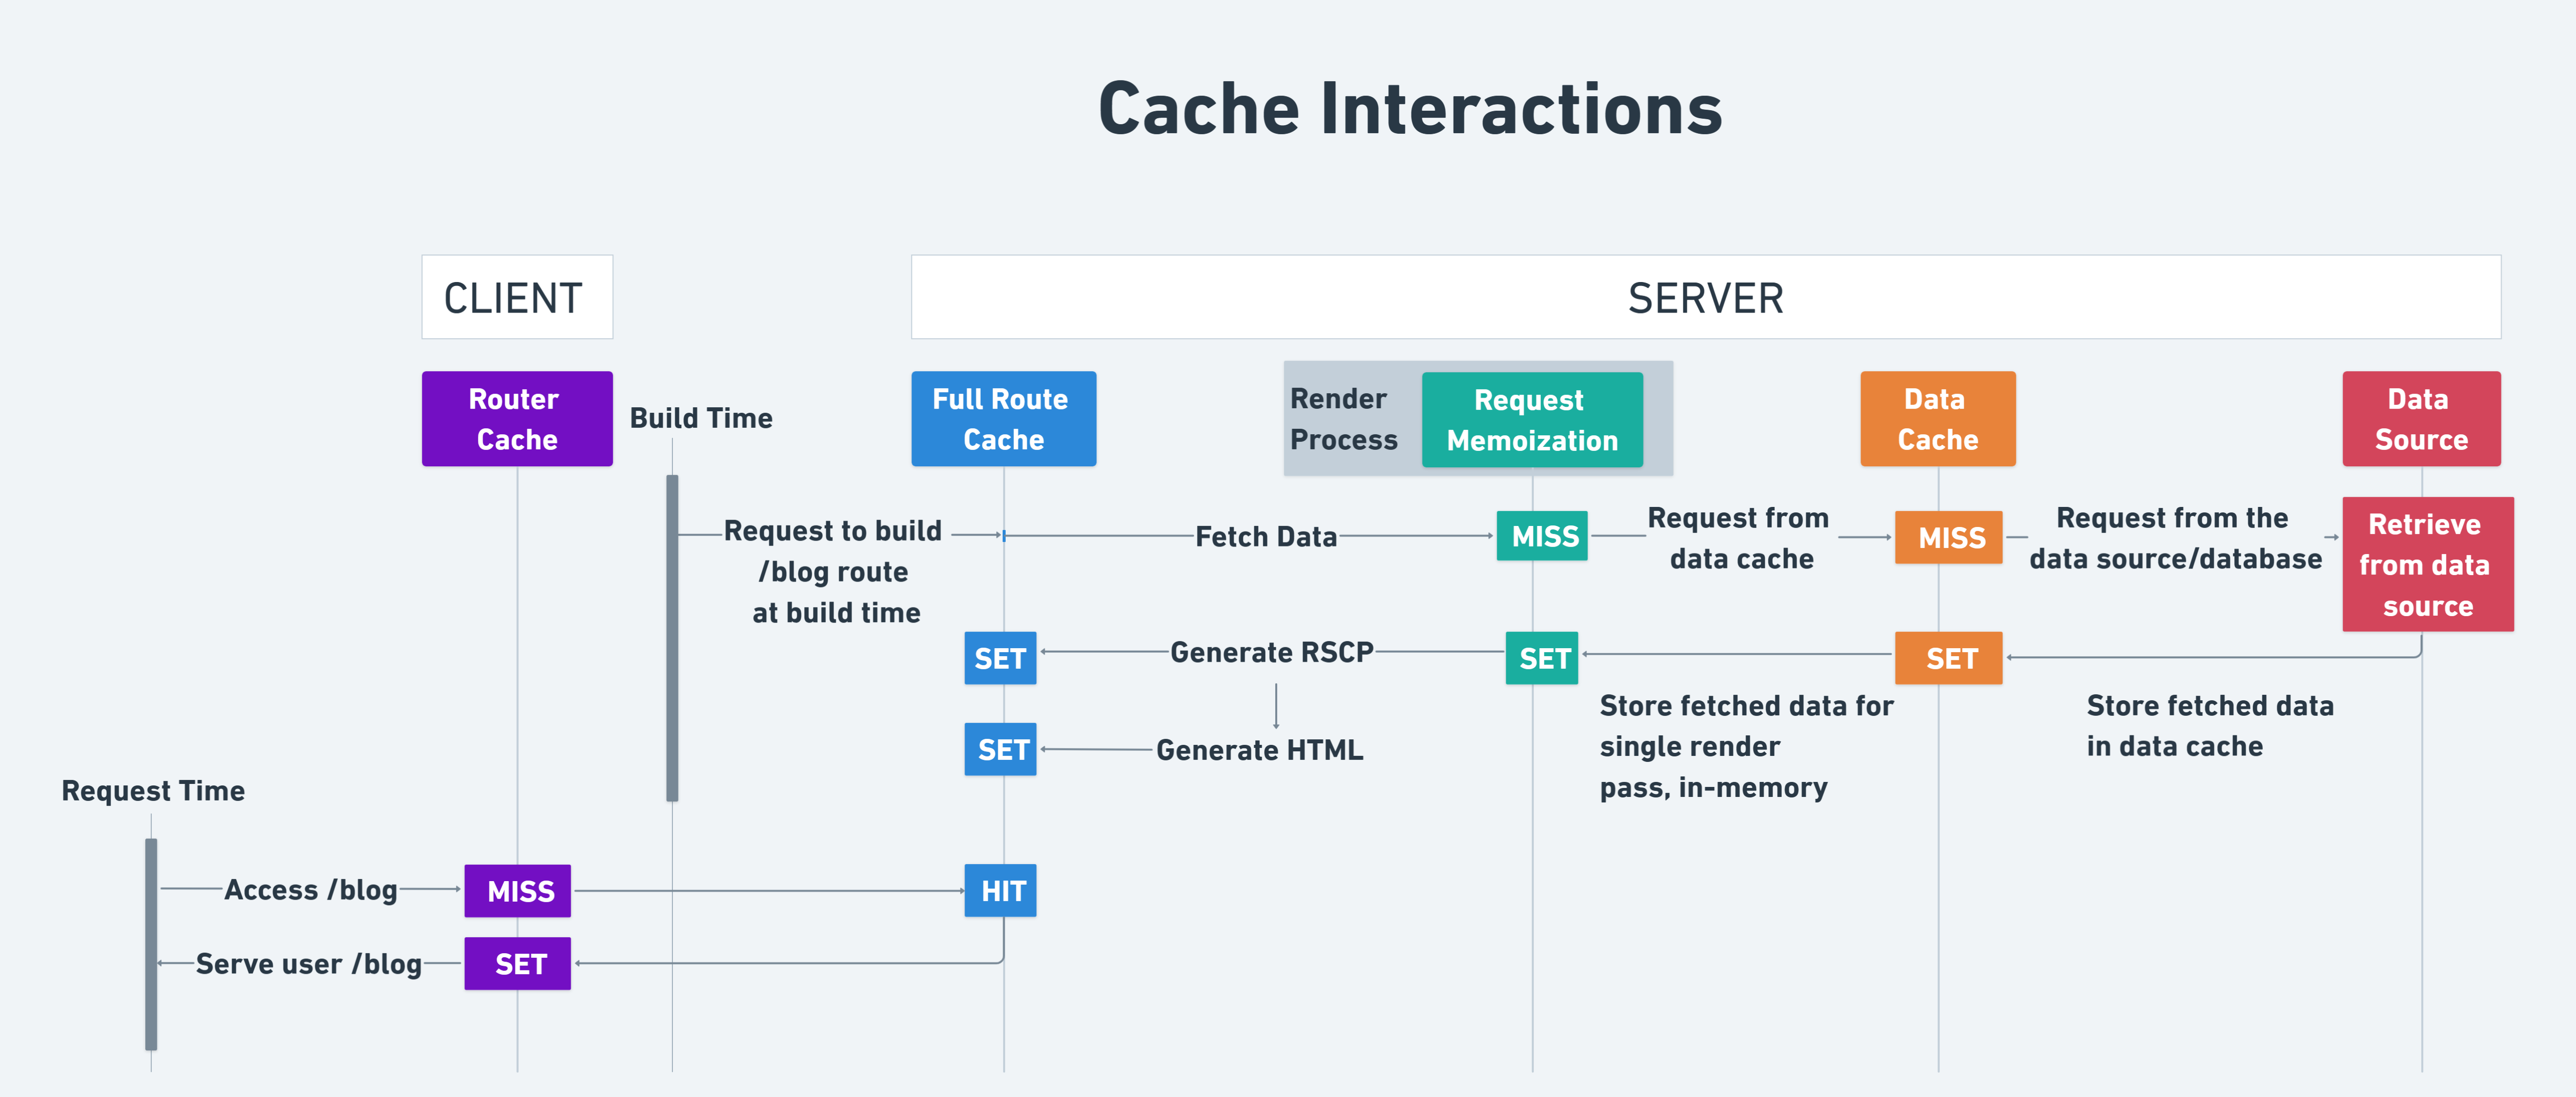
In the image above, you probably noticed the term “Build Time” and “Request Time”. To make sure this does not cause any confusion throughout the article, let me explain them before we move forward.
Build time refers to when an aplication is built and deployed. Anything that is cached during this process (mostly static content) will be part of the build time cache. The build time cache is only updated when the application is rebuilt and redeployed.
Request time refers to when a user requests a page. Typically, data cached at request time is dynamic as we want to fetch it directly from the data source when the user makes requests.
Next.js Caching Mechanisms
Understanding Next.js’s caching can seem daunting at first. This is because it is composed of four distinct caching mechanisms which each operating at different stages of your application and interacting in ways that can initially appear complex.
Here are the four caching mechanisms in Next.js:
- Request Memoization
- Data Cache
- Full Route Cache
- Router Cache
For each of the above, I will delve into their specific roles, where they’re stored, their duration, and how you can effectively manage them, including ways to invalidate the cache and opt out. By the end of this exploration, you’ll have a solid grasp of how these mechanisms work together to optimize Next.js’s performance.
Request Memoization
One common problem in React is when you need to display the same information in multiple places on the same page. The easiest option is to just fetch the data in both places that it is needed, but this is not ideal since you are now making two requests to your server to get the same data. This is where Request Memoization comes in.
Request Memoization is a React feature that actually caches every fetch request you make in a server component during the render cycle (which basically just refers to the process of rendering all the components on a page). This means that if you make a fetch request in one component and then make the same fetch request in another component, the second fetch request will not actually make a request to the server. Instead, it will use the cached value from the first fetch request.
export default async function fetchUserData(userId) {
  // The `fetch` function is automatically cached by Next.js
  const res = await fetch(`https://api.example.com/users/${userId}`)
  return res.json();
}

export default async function Page({ params }) {
  const user = await fetchUserData(params.id)

  return <>
    <h1>{user.name}</h1>
    <UserDetails id={params.id} />
  </>
}

async function UserDetails({ id }) {
  const user = await fetchUserData(id)
  return <p>{user.name}</p>
}
In the code above, we have two components: Page and UserDetails. The first call to the fetchUserData() function in Page makes a fetch request just like normal, but the return value of that fetch request is stored in the Request Memoization cache. The second time fetchUserData is called by the UserDetails component, does not actually make a new fetch request. Instead, it uses the memoized value from the first time this fetch request was made. This small optimization drastically increases the performance of your application by reducing the number of requests made to your server and it also makes your components easier to write since you don’t need to worry about optimizing your fetch requests.
It is important to know that this cache is stored entirely on the server which means it will only cache fetch requests made from your server components. Also, this cache is completely cleared at the start of each request which means it is only valid for the duration of a single render cycle. This is not an issue, though, as the entire purpose of this cache is to reduce duplicate fetch requests within a single render cycle.
Lastly, it is important to note that this cache will only cache fetch requests made with the GET method. A fetch request must also have the exact same parameters (URL and options) passed to it in order to be memoized.
Caching Non-fetch Requests
By default React only caches fetch requests, but there are times when you might want to cache other types of requests such as database requests. To do this, we can use React’s cache function. All you need to do is pass the function you want to cache to cache and it will return a memoized version of that function.
import { cache } from "react"
import { queryDatabase } from "./databaseClient"

export const fetchUserData = cache(userId => {
  // Direct database query
  return queryDatabase("SELECT * FROM users WHERE id = ?", [userId])
})
In this code above, the first time fetchUserData() is called, it queries the database directly, as there is no cached result yet. But the next time this function is called with the same userId, the data is retrieved from the cache. Just like with fetch, this memoization is valid only for the duration of a single render pass and works identical to the fetch memoization.
Revalidation
Revalidation is the process of clearing out a cache and updating it with new data. This is important to do since if you never update a cache it will eventually become stale and out of date. Luckily, we don’t have to worry about this with Request Memoization since this cache is only valid for the duration of a single request we never have to revalidate.
Opting out
To opt out of this cache, we can pass in an AbortController signal as a parameter to the fetch request.
async function fetchUserData(userId) {
  const { signal } = new AbortController()
  const res = await fetch(`https://api.example.com/users/${userId}`, {
    signal,
  })
  return res.json()
}
Doing this will tell React not to cache this fetch request in the Request Memoization cache, but I would not recommend doing this unless you have a very good reason to as this cache is very useful and can drastically improve the performance of your application.
The diagram below provides a visual summary of how Request Memoization works.

Data Cache
Request Memoization is great for making your app more performant by preventing duplicate fetch request, but when it comes to caching data across requests/users it is useless. This is where the data cache comes in. It is the last cache that is hit by Next.js before it actually fetches your data from an API or database and is persistent across multiple requests/users.
Imagine we have a simple page that queries an API to get guide data on a specific city.
export default async function Page({ params }) {
  const city = params.city
  const res = await fetch(`https://api.globetrotter.com/guides/${city}`)
  const guideData = await res.json()

  return (
    <div>
      <h1>{guideData.title}</h1>
      <p>{guideData.content}</p>
      {/* Render the guide data */}
    </div>
  )
}
This guide data really doesn’t change often at all so it doesn’t actually make sense to fetch this data fresh everytime someone needs it. Instead we should cache that data across all requests so it will load instantly for future users. Normally, this would be a pain to implement, but luckily Next.js does this automatically for us with the Data Cache.
By default every fetch request in your server components will be cached in the Data Cache (which is stored on the server) and will be used for all future requests. This means that if you have 100 users all requesting the same data, Next.js will only make one fetch request to your API and then use that cached data for all 100 users. This is a huge performance boost.
Duration
The Data Cache is different than the Request Memoization cache in that data from this cache is never cleared unless you specifically tell Next.js to do so. This data is even persisted across deployments which means that if you deploy a new version of your application, the Data Cache will not be cleared.
Revalidation
Since the Data Cache is never cleared by Next.js we need a way to opt into revalidation which is just the process of removing data from the cache. In Next.js there are two different ways to do this: time-based revalidation and on-demand revalidation.
Time-based Revalidation
The easiest way to revalidate the Data Cache is to just automatically clear the cache after a set period of time. This can be done in two ways.
const res = fetch(`https://api.globetrotter.com/guides/${city}`, {
  next: { revalidate: 3600 },
})
The first way is to pass the next.revalidate option to your fetch request. This will tell Next.js how many seconds to keep your data in the cache before it is considered stale. In the example above, we are telling Next.js to revalidate the cache every hour.
The other way to set a revalidation time is to use the revalidate segment config option.
export const revalidate = 3600

export default async function Page({ params }) {
  const city = params.city
  const res = await fetch(`https://api.globetrotter.com/guides/${city}`)
  const guideData = await res.json()

  return (
    <div>
      <h1>{guideData.title}</h1>
      <p>{guideData.content}</p>
      {/* Render the guide data */}
    </div>
  )
}
Doing this will make all fetch requests for this page revalidate every hour unless they have their own more specific revalidation time set.
The one important thing to understand with time based revalidation is how it handles stale data.
The first time a fetch request is made it will get the data and then store it in the cache. Each new fetch request that occurs within the 1 hour revalidation time we set will use that cached data and make no more fetch requests. Then after 1 hour, the first fetch request that is made will still return the cached data, but it will also execute the fetch request to get the newly updated data and store that in the cache. This means that each new fetch request after this one will use the newly cached data. This pattern is called stale-while-revalidate and is the behavior that Next.js uses.
On-demand Revalidation
If your data is not updated on a regular schedule, you can use on-demand revalidation to revalidate the cache only when new data is available. This is useful when you want to invalidate the cache and fetch new data only when a new article is published or a specific event occurs.
This can be done one of two ways.
import { revalidatePath } from "next/cache"

export async function publishArticle({ city }) {
  createArticle(city)

  revalidatePath(`/guides/${city}`)
}
The revalidatePath function takes a string path and will clear the cache of all fetch request on that route.
If you want to be more specific in the exact fetch requests to revalidate, you can use revalidateTag function.
const res = fetch(`https://api.globetrotter.com/guides/${city}`, {
  next: { tags: ["city-guides"] },
})
Here, we’re adding the city-guides tag to our fetch request so we can target it with revalidateTag.
import { revalidateTag } from "next/cache"

export async function publishArticle({ city }) {
  createArticle(city)

  revalidateTag("city-guides")
}
By calling revalidateTag with a string it will clear the cache of all fetch request with that tag.
Opting out
Opting out of the data cache can be done in multiple ways.
no-store
const res = fetch(`https://api.globetrotter.com/guides/${city}`, {
  cache: "no-store",
})
By passing cache: "no-store" to your fetch request, you are telling Next.js to not cache this request in the Data Cache. This is useful when you have data that is constantly changing and you want to fetch it fresh every time.
You can also call the noStore function to opt out of the Data Cache for everything within the scope of that function.
import { unstable_noStore as noStore } from "next/cache"

function getGuide() {
  noStore()
  const res = fetch(`https://api.globetrotter.com/guides/${city}`)
}This is a really great way to opt out of caching on a per component or per function basis since all other opt out methods will opt out of the Data Cache for the entire page.
export const dynamic = 'force-dynamic'
If we want to change the caching behavior for an entire page and not just a specific fetch request, we can add this segment config option to the top level of our file. This will force the page to be dynamic and opt out of the Data Cache entirely.
export const dynamic = "force-dynamic"export const revalidate = 0
Another way to opt the entire page out of the data cache is to use the revalidate segment config option with a value of 0
export const revalidate = 0This line is pretty much the page-level equivalent of cache: "no-store". It applies to all requests on the page, ensuring nothing gets cached.
Caching Non-fetch Requests
So far, we have only seen how to cache fetch requests with the Data Cache, but we can do much more than that.
If we go back to our previous example of city guides, we might want to pull data directly from our database. For this, we can use the cache function that’s provided by Next.js. This is similar to the React cache function, except it applies to the Data Cache instead of Request Memoization.
import { getGuides } from "./data"
import { unstable_cache as cache } from "next/cache"

const getCachedGuides = cache(city => getGuides(city), ["guides-cache-key"])

export default async function Page({ params }) {
  const guides = await getCachedGuides(params.city)
  // ...
}The code above is short, but it can be confusing if this is the first time you are seeing the cache function.
The cache function takes three parameters (but only two are required). The first parameter is the function you want to cache. In our case it is the getGuides function. The second parameter is the key for the cache. In order for Next.js to know which cache is which it needs a key to identify them. This key is an array of strings that must be unique for each unique cache you have. If two cache functions have the same key array passed to them they will be considered the same exact request and stored in the same cache (similar to a fetch request with the same URL and params).
The third parameter is an optional options parameter where you can define things like a revalidation time and tags.
In our particular code we are caching the results of our getGuides function and storing them in the cache with the key ["guides-cache-key"]. This means that if we call getCachedGuides with the same city twice, the second time it will use the cached data instead of calling getGuides again.
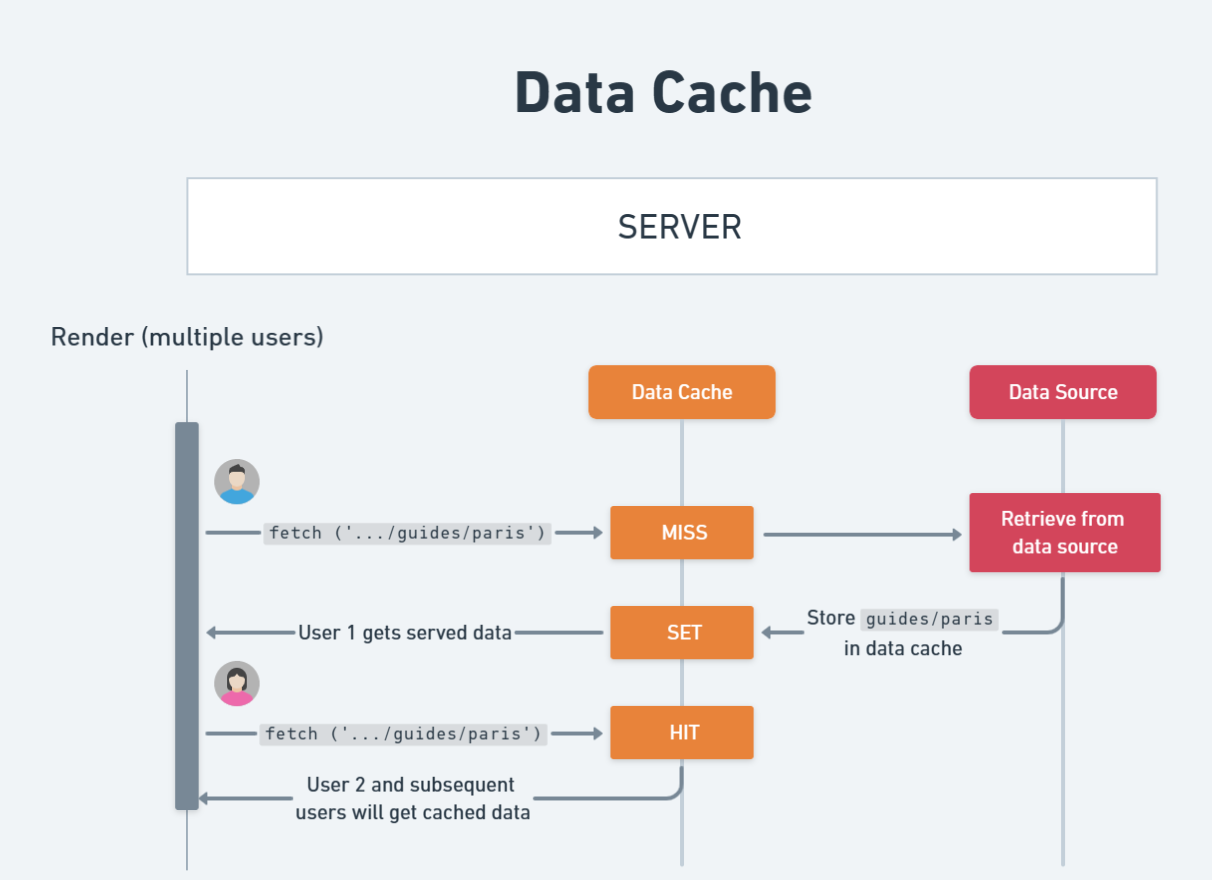
Below is a diagram that walks you through how the Data Cache operates, step by step.
Full Route Cache
The third type of cache is the Full Route Cache, and this one is a bit easier to understand since is much less configurable than the Data Cache. The main reason this cache is useful is because it lets Next.js cache static pages at build time instead of having to build those static pages for each request.
In Next.js, the pages we render to our clients consist of HTML and something called the React Server Component Payload (RSCP). The payload contains instructions for how the client components should work together with the rendered server components to render the page. The Full Route Cache stores the HTML and RSCP for static pages at build time.
Now that we know what it stores, let’s take a look at an example.
import Link from "next/link"

async function getBlogList() {
  const blogPosts = await fetch("https://api.example.com/posts")
  return await blogPosts.json()
}

export default async function Page() {
  const blogData = await getBlogList()

  return (
    <div>
      <h1>Blog Posts</h1>
      <ul>
        {blogData.map(post => (
          <li key={post.slug}>
            <Link href={`/blog/${post.slug}`}>
              <a>{post.title}</a>
            </Link>
            <p>{post.excerpt}</p>
          </li>
        ))}
      </ul>
    </div>
  )
}
In the code I have above, Page will be cached at build time because it does not contain any dynamic data. More specifically, its HTML and RSCP will be stored in the Full Router Cache so that it is served faster when a user requests access. The only way this HTML/RSCP will be updated is if we redeploy our application or manually invalidate the data cache that this page depends on.
Similarly to the Data Cache the Full Route Cache is stored on the server and persists across different requests and users, but unlike the Data Cache, this cache is cleared every time you redeploy your application.
Opting out
Opting out of the Full Route Cache can be done in two ways.
The first way is to opt out of the Data Cache. If the data you are fetching for the page is not cached in the Data Cache then the Full Route Cache will not be used.
The second way is to use dynamic data in your page. Dynamic data includes things such as the headers, cookies, or searchParams dynamic functions, and dynamic URL parameters such as id in /blog/[id].
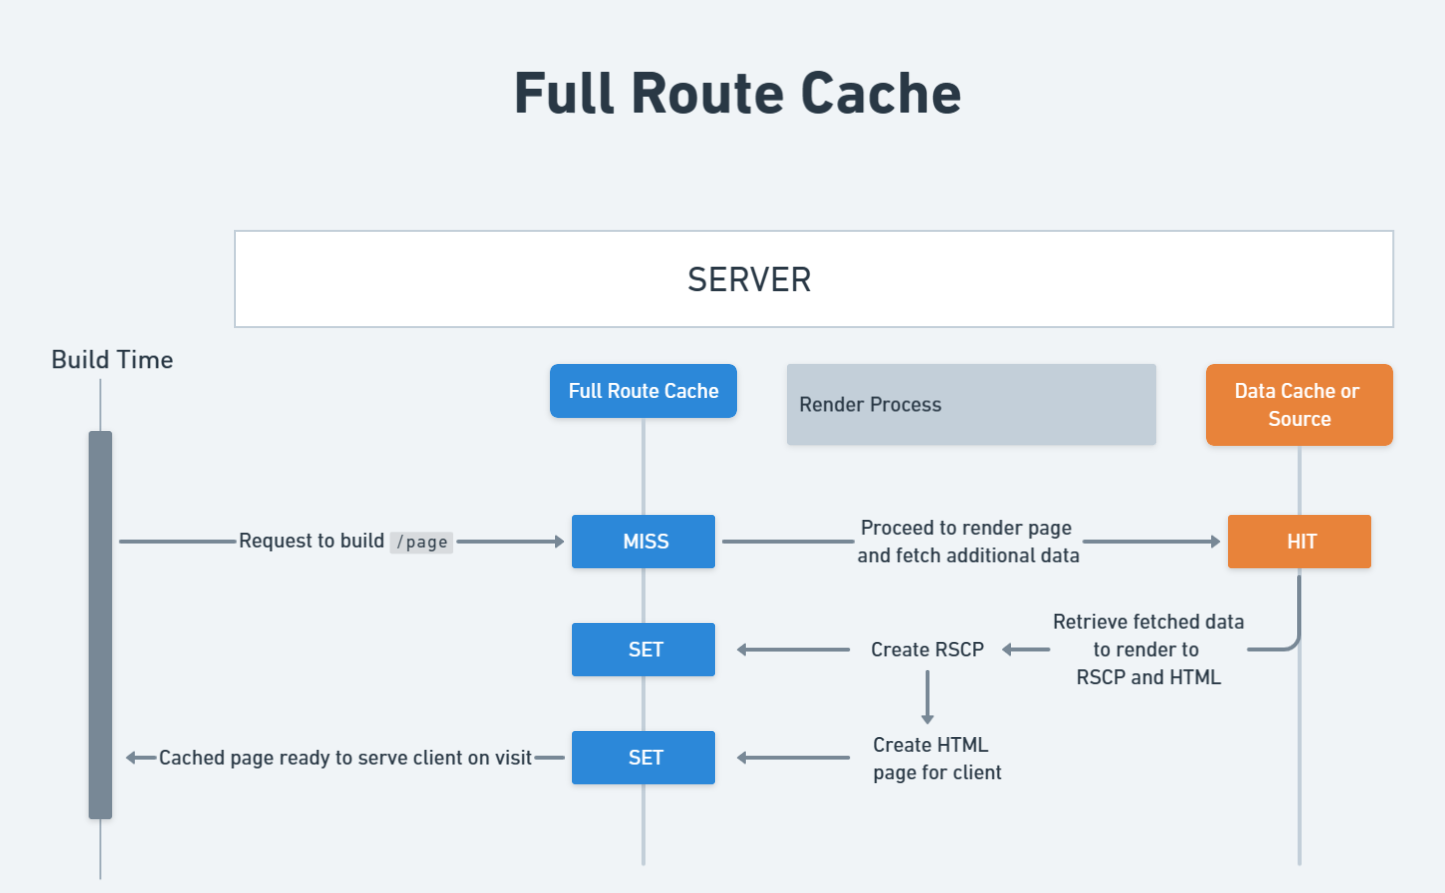
The diagram below demonstrates the step-by-step process of how Full Route Cache works.
Router Cache
This last cache is a bit unique in that it is the only cache that is stored on the client instead of on the server. It can also be the source of many bugs if not understood properly. This is because it caches routes that a user visits so when they come back to those routes it uses the cached version and never actually makes a request to the server While this approach is an advantage when it comes to page loading speeds, it can also be quite frustrating. Let’s take a look below at why.
export default async function Page() {
  const blogData = await getBlogList()

  return (
    <div>
      <h1>Blog Posts</h1>
      <ul>
        {blogData.map(post => (
          <li key={post.slug}>
            <Link href={`/blog/${post.slug}`}>
              <a>{post.title}</a>
            </Link>
            <p>{post.excerpt}</p>
          </li>
        ))}
      </ul>
    </div>
  )
}
In the code I have above, when the user navigates to this page, its HTML/RSCP gets stored in the Router Cache. Similarly, when they navigate to any of the /blog/${post.slug} routes, that HTML/RSCP also gets cached. This means if the user navigates back to a page they have already been to it will pull that HTML/RSCP from the Router Cache instead of making a request to the server.
Duration
The router cache is a bit unique in that the duration it is stored for depends on the type of route. For static routes, the cache is stored for 5 minutes, but for dynamic routes, the cache is only stored for 30 seconds. This means that if a user navigates to a static route and then comes back to it within 5 minutes, it will use the cached version. But if they come back to it after 5 minutes, it will make a request to the server to get the new HTML/RSCP. The same thing applies to dynamic routes, except the cache is only stored for 30 seconds instead of 5 minutes.
This cache is also only stored for the user’s current session. This means that if the user closes the tab or refreshes the page, the cache will be cleared.
You can also manually revalidate this cache by clearing the data cache from a server action using revalidatePath/revalidateTag. You can also call the router.refresh function which you get from the useRouter hook on the client. This will force the client to refetch the page you are currently on.
Revalidation
We already discussed two ways of revalidation in the previous section but there are plenty of other ways to do it.
We can revalidate the Router Cache on demand similar to how we did it for the Data Cache. This means that revalidating Data Cache using revalidatePath or revalidateTag also revalidates the Router Cache.
Opting out
There is no way to opt out of the Router Cache, but considering the plethora of ways to revalidate the cache it is not a big deal.
Here is an image that provides a visual summary of how the Router Cache works.

Conclusion
Having multiple caches like this can be difficult to wrap your head around, but hopefully this article was able to open your eyes to how these caches work and how they interact with one another. While the official documentation mentions that knowledge of caching is not necessary to be productive with Next.js, I think it helps a lot to understand its behavior so that you can configure the settings that work best for your particular app.
The table below summarizes all four caching mechanisms and their details.
| Cache | Description | Location | Revalidation Criteria |
|---|---|---|---|
| Data Cache | Stores data across user requests and deployments | Server | Time-based or on-demand revalidation |
| Request Memoization | Re-use values in same render pass for efficiency | Server | N/A, only lasts for the lifetime of a server request |
| Full Route Cache | Caches static routes at build time to improve performance | Server | Revalidated by revalidating Data Cache or redeploying the application |
| Router Cache | Stores navigated routes to optimize navigation epxerience | Client | Automatic invalidation after a specific time or when the data cache is cleared |