Markdown Crash Course
June 19, 2023
I love Markdown. It is a fairly easy to use markup language that lets you write simple text which can then be converted to HTML (or any other medium) with ease. It is used in many places, such as, GitHub README files, Reddit comments, and even this blog. That’s right every article in this blog is written using Markdown which just goes to show how powerful Markdown is and in this quick article I will share everything you need to know about Markdown. Also, if you want you can check out the source code for this article since it is written in Markdown. Just make sure you view the Code tab and not the Preview tab if you want to see what the actual code looks like.
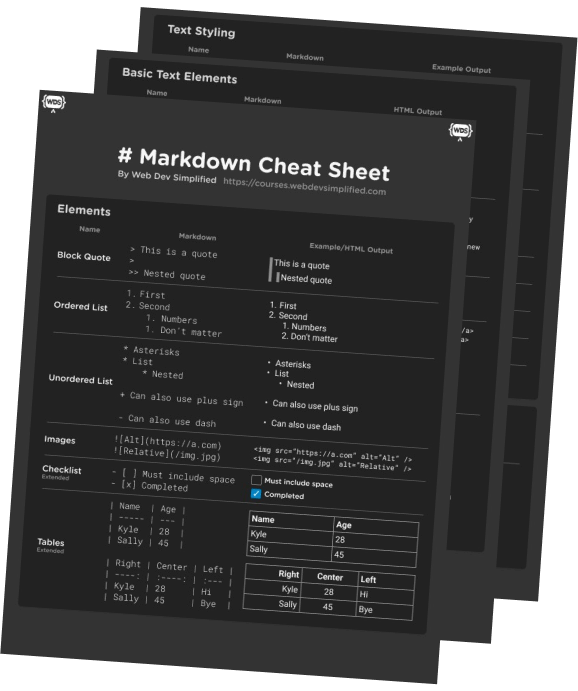
PS: I have a complete Markdown cheat sheet that covers everything you need to know about Markdown with visual examples that you can download for free.
Also, at the bottom of this page there is an interactive Markdown editor that you can use to test out Markdown for yourself and see the results instantly.
Markdown Basics
Markdown is mainly used to style and layout text so the first things we are going to cover are the absolute basic text layouts you can do with Markdown. Also, to create a markdown file you just need to end your file with the .md extension.
Headings
Just like HTML, Markdown has six levels of headings. Headings in Markdown are created by putting one to six # in front of your heading text with a space separating the # and text. Each # represents a heading level with # being the largest heading and ###### being the smallest heading. Here is an example of all six heading levels.
Heading 1
Heading 2
Heading 3
Heading 4
Heading 5
Heading 6
As you can see the more #’s we add the smaller the heading is. If you inspected the HTML generated you would notice each heading is actually just an <h1>-<h6> tag. Also, if you want you can edit the code above and your changes will be reflected on the right pane. Every code example in this article will have this feature so you can play around with the code and see the results instantly.
Paragraphs
Paragraphs in Markdown are the default text layout. If you just type text it will automatically be converted to a paragraph. The only important thing to know about Markdown is that if you want to seperate text into two seperate paragraphs you need to add a blank line between each set of text. If you instead just want to have a new line within your paragraph you can add two spaces at the end of the line and it will be converted to a new line.
This is a paragraph.
Since there is a new line between these two sentences they will be converted to two separate paragraphs.
This paragraph has new lines in it but it will not show up as a new line in the output.
This paragraph
has two spaces HERE
so it will push this onto a new line within the same paragraph.
Extended Markdown
One important thing to note about Markdown is that there are a lot of different variations, typically referred to as flavors. The base version of Markdown is quite a bit more limited in the formatting/styling you can do with it, but most websites that use Markdown will use some flavor which extends on Markdown. For example, GitHub uses a flavor of Markdown called GitHub Flavored Markdown which adds a lot of extra features to Markdown.
In this article I will be covering both the base Markdown features as well as some of the more common extended Markdown features found within GitHub Flavored Markdown as that is the most common Markdown flavor you will see. Whenever I talk about an extended feature I will make sure to mention that it is an extended feature and not part of the base Markdown specification.
Text Styling
Besides just determing what element your text should render as, you can also determine how your text should be styled.
Bold/Italics
The two most common types of text are bold and italics. These can be generated by using one * or _ wrapping your text for italics or two * or _ for bold.
This is italicized text
This is also italicized text
This is bold text
This is also bold text
In order to combine bold and italics you can just wrap your text in three * or _ and it will be both bold and italicized.
This is both
This is also both
Generally, it is recommended to use * instead of _ since somtimes Markdown does not work well if you have _ in the middle of a word.
Strikethrough
Here we come to our first extended Markdown feature. To create strikethrough text you can wrap your text in two ~ characters.
Crossed off
Highlight
Another extended Markdown feature is highlighting text. To highlight text you can wrap your text in two = characters. Unfortunately, GitHub Flavored Markdown does not support this feature so it will not work in the editor below, but you can use HTML within Markdown (sometimes) so I also included the HTML version of this feature.
==Highlighted==
Highlighted
Superscript/Subscript
The second to last extended Markdown feature we will cover is superscript and subscript text. To create superscript text you can wrap your text with a ^ character and to create subscript text you can wrap your text with a ~ character. This again does not work with GitHub Flavored Markdown so I have included the HTML version of this feature.
This is a ^superscript^
This is a subscript
This is a superscript
This is a subscript
Emoji
The last extended Markdown feature we will cover is ading emojis. To add an emoji you can just type :EMOJI_NAME: and it will be converted to an emoji. This feature is much less widely supported than some of the other extended Markdown features covered up to this point and does not work with GitHub Flavored Markdown, but you can just copy the emoji into your Markdown and it will work.
:smile:
😊
Handling Code
One of the most common uses of Markdown is to display code. By default you can display code inline or in a code block.
Inline Code
To display code inline you can wrap your code in a single ` character. This is useful for displaying small snippets of code within a paragraph.
This is inline code within a paragraph.
Code Blocks
To display a larger block of code you can wrap your code in three ` characters. You can also specify the language of your code block by adding the language name after the three ` characters. This will add syntax highlighting to your code block. This is an extended feature of Markdown, but nearly every Markdown flavor supports it.
// This is a code block
const a = 1;
You will notice that by default this code block does not have syntax highlighting. This is because rendering syntax highlighting requires extra CSS and JavaScript which is not included in this Markdown editor. My blog’s code blocks, however, do have syntax highlighting so if I were to use the exact same code block within my blog it would look like this.
// This is a code block
const a = 1;
Again, if you want to see this more in depth view the source code for this article.
Other Elements
So far we have covered how to style text and how to display code, but Markdown also supports quite a few other elements.
Links
To create a link you can wrap your text in square brackets and then wrap the link in parentheses. You can even do this to make relative links. Also, if you include a URL on its own it will automatically be converted to a link in some extended Markdown flavors, otherwise you can wrap it in <> to make it a link.
Images
Images look very similar to links since they are also wrapped in square brackets and parentheses. The only difference is that you need to add an exclamation mark before the square brackets. Also, the text in the square brackets is used as the alt text for the image while the link in the parentheses is used as the source for the image.

Blockquotes
Blockquotes are used to quote another source. To create a blockquote you can add a > character before your text. You can also nest blockquotes by adding multiple > characters.
This is a blockquote
This is a nested blockquote
Horizontal Rule
To add a horizontal rule you can add three or more -, _, or * characters on a single line.
This is above the horizontal rule
This is between the horizontal rules
This is between the horizontal rules
This is below the horizontal rule
Lists
There are two types of lists in Markdown, ordered and unordered. To create an unordered list you can add a -, *, or + character before each item in your list. To create an ordered list you can add a number followed by a . character before each item in your list. The actual order of the numbers you use does not matter. You can also nest lists by indenting them with four spaces and/or a tab.
- This is an unordered list
- Of items
- This is an ordered list
- The numbers do not matter
- This says 3
- This is a nested list
- Of items
- This is a nested
- List of items
Tables
The second to last element we will cover is tables. Tables are a bit more complicated than the other elements we have covered so far. To create a table you need to create a list of rows where each column is separated by a | and each row starts and ends with a | as well. Below the first row you need to add a row where each column consists of at least three -s and optionally a : character on either side of the -s. The : character is used to align the text in the column. If you add a : character on the left side of the -s then the text will be left aligned. If you add a : character on the right side of the -s then the text will be right aligned. If you add a : character on both sides of the -s then the text will be center aligned. Finally, you can continue to add rows to your table with the same format as your first row. This sounds really complicated but once you see it in action it makes sense.
Also, this is an extended Markdown feature, but it does work with GitHub Flavored Markdown.
| Col 1 | Col 2 |
|---|---|
| This | is |
| an | example |
| table | with |
| two | columns |
| Right | Center | Left |
|---|---|---|
| R | C | L |
| Head One | Head Two |
|---|---|
| Does Not Need | To Be |
| Aligned | Properly |
Checklist
The last element we will cover is the checklist. This is an extended Markdown feature, but it is supported by GitHub Flavored Markdown. To create a checklist you can add a - [ ] or - [x] before each item in your list. The - [ ] will create an unchecked checkbox while the - [x] will create a checked checkbox.
- Unchecked
- Checked
Conclusion
Markdown is a very powerful tool that can be used to style text, display code, and much more. If you want to continue improving your Markdown skills you can use the large interactive Markdown editor below.
Interactive Markdown Editor
If you want to ensure you never forget any of Markdown’s syntax you should download my free Markdown Cheat Sheet. It contains all of the syntax covered in this article and more.
Interactive
Don't forget to checkout the full Markdown Cheat Sheet.